How to Install Wig with Got2b Spray: The Ultimate Step-by-Step Guide for a Flawless, Long-Lasting Hold
Okay, real talk — there is nothing more frustrating than spending a whole hour slaying your wig only to have it shift sideways the moment you step outside. We’ve all been there, and honestly? It’s not cute. But here’s the good news: Got2b Glued Blasting Freeze Spray has become the holy grail of DIY wig installation, and for incredibly good reason. It’s affordable, accessible, and it works like an absolute dream.
This post contains affiliate links. If you purchase through my links, I may earn a small commission at no extra cost to you. I only ever recommend products I genuinely believe in.
In this guide, we’re going to walk through everything you need to know about how to install wig with Got2b spray — from prepping your natural hair and skin to laying that lace so flat it’s practically invisible. Whether you’re working with a lace front, a full lace wig, or a closure wig, this method applies beautifully across the board. Let’s get started, gorgeous!
What Exactly Is Got2b Glued Spray — and Why Does Everyone Swear by It?
Before we jump into the how-to, let’s talk about the star of the show. Got2b Glued Blasting Freeze Spray (often shortened to “Got2b spray” by the wig community) is a hair-styling product originally designed to hold hairstyles in extreme conditions. Think of it like the overachieving cousin of your average hairspray — it holds hard, and it holds long.
The wig community caught on pretty quickly that this product works phenomenally well for securing lace wigs without the mess and commitment of traditional wig glue or tape. It’s also significantly more gentle on your skin than many adhesive alternatives, which is a massive W. You can find it easily at most drugstores, beauty supply shops, or grab it right on Amazon here. Pro tip: always go for the purple can — that’s the Blasting Freeze formula, and it’s the one that delivers that rock-solid, gale-force hold.
What You’ll Need Before You Begin
Preparation is literally 80% of a perfect wig install. Don’t skip this part — gathering your supplies before you sit down at your mirror saves time and prevents those mid-install panic moments. Here’s your checklist:
- Your lace front or full lace wig (lace trimmed, if needed)
- Got2b Glued Blasting Freeze Spray (purple can)
- Got2b Glued Styling Gel (optional but excellent for extra hold)
- A wig cap that matches your skin tone
- Edge brush or toothbrush for pressing the lace
- Blow dryer (on cool or low heat setting)
- Rubbing alcohol and cotton pad (to prep your skin)
- Concealer or wig-matching foundation (for the hairline)
- Rattail comb for parting
- Bobby pins or wig clips (for securing during drying)
- A scarf or headband for laying your edges
Quality wigs make this process infinitely easier, by the way. If you’re still searching for the perfect unit, check out the gorgeous collections at Ashimary Hair or KissLove Hair — both offer stunning lace front and HD lace options that melt beautifully into the skin.
Recommended Products to Pair with Your Got2b Spray
💧Got2b Glued Freeze Spray
The OG. Purple can. Maximum hold. Community-approved.
Shop on Amazon
🥉Got2b Glued Gel
Use alongside the spray for a double-duty, ultra-secure bond.
Shop on Amazon
💍Lace Front Wigs
Browse HD lace and transparent lace wigs for flawless blending.
KissLove Hair
Step One: Preparing Your Natural Hair and Scalp
Alright, let’s get into the nitty-gritty! The foundation of a great wig install is — surprise — your foundation. Your natural hair needs to be flat, smooth, and completely out of the way before your wig goes anywhere near your head.
Start by braiding your natural hair down into flat braids, cornrows, or two flat twists going backward toward the nape. If your hair is short, you can simply lay it flat with a bristle brush and some setting spray. Tuck any stray ends and secure everything firmly. Then, roll on your wig cap. Make sure it’s snug and your natural hairline is covered completely. Use a flesh-colored or brown wig cap for a more natural-looking hairline — the right cap color makes a huge difference when you’re rocking a lace front!
💡 Pro Tip
Wipe your hairline with a cotton pad soaked in rubbing alcohol before applying anything. This removes oils and light makeup from your skin, which allows the Got2b spray to bond much more effectively. Don’t skip this step — it’s a genuine game-changer!
How to Install Wig with Got2b Spray: Step-by-Step
This is the main event, people! Follow these steps carefully, and you’ll end up with an install so clean, people will genuinely question whether it’s your real hair. Here we go:
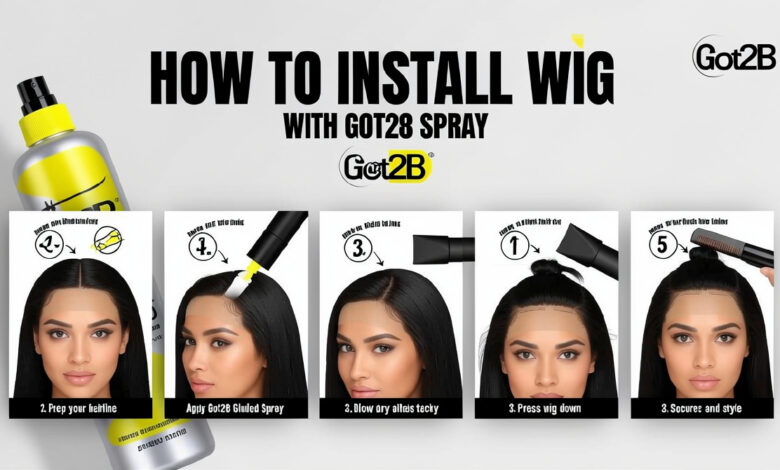
Position Your Wig
Place the wig on your head and align the hairline to where you naturally want it to sit — typically about half an inch above your natural hairline for a natural look. Use your ear tabs as reference points. Secure with bobby pins or wig clips temporarily while you work.
Fold Back the Lace
Gently fold the lace front back onto the hair of the wig, exposing just the perimeter of lace that will be glued down. This gives you a clean surface to work on without getting product on the actual hair fibers.
Apply the First Layer of Got2b Spray
Hold the Got2b spray about 4–6 inches from your hairline and spritz a thin, even layer along your perimeter — from temple to temple. Let it get tacky for about 30 seconds. Don’t rush this part! The tackiness is what creates the grip.
Press the Lace Down
Lay the lace flat over the Got2b spray and press it firmly with your fingertips. Work from the center of your forehead outward toward your temples. Use a clean edge brush or the back of a comb to press the lace down and smooth out any bubbles or lifting edges.
Apply a Second Layer & Blow Dry
Here’s the secret step most tutorials skip! Once the lace is pressed down, spritz one more layer of Got2b spray over the top of the lace. Then use your blow dryer on the cool setting (or very low heat) for about 30–45 seconds to help set the bond. This dramatically increases the longevity of your install.
Wrap & Wait
Lay a silk or satin scarf over your hairline and tie it snugly. Wait at least 15–20 minutes for everything to fully set. Yes, seriously — be patient! This waiting time is crucial. Use the time to do your makeup or sip your morning coffee.
Unwrap & Style
Gently remove the scarf and reveal your fresh install! Use a rattail comb to style your part, then touch up your hairline with foundation or concealer that matches your skin tone for the most seamless blend. Add a little Got2b gel to your baby hairs for that finishing flourish!
And just like that — you’ve nailed how to install wig with Got2b spray like a complete professional. Honestly? The whole process gets faster and easier every time you do it. Practice makes perfect, and your second install will feel miles easier than your first.
How Long Will Your Got2b Spray Install Last?
Great question, and one we hear all the time! On average, a Got2b spray wig install can last anywhere from one to two weeks, depending on several factors — your skin type, the climate you’re in, your activity level, and how well you maintain it overnight.
Oily skin types may find the hold loosens faster, as natural oils can break down the adhesive. Wrapping your wig with a silk bonnet or scarf at night makes a world of difference for longevity. If you live in a humid area (we see you, Florida!), consider doing a double-layer application and using the Got2b gel underneath for extra reinforcement. For premium quality lace wigs that bond even more naturally, Ashimary Hair’s HD lace collection is absolutely worth checking out.
Nighttime Care Tip: Before bed, wrap your hairline loosely with a silk or satin scarf. Don’t apply it so tightly that it disturbs the lace — just enough to protect it from friction and moisture while you sleep. Your install will thank you in the morning!
Extra Pro Tips for a More Secure and Natural-Looking Install
Okay, these are the little nuggets of wisdom that separate a “nice” install from a “wait, is that her real hair?!” install. Take notes, because these details genuinely make all the difference:
- Trim your lace carefully. A bad lace trim is the number-one giveaway. Cut in tiny, curved snips rather than straight across — it mimics the natural, irregular growth pattern of a hairline.
- Choose the right lace color. Transparent or HD lace melts into the skin much better than brown lace on lighter skin tones, and vice versa. Match the lace to your skin undertone for the most undetectable result.
- Melt it with heat strategically. A quick pass of a flat iron (with a thin cloth between the iron and lace) can help the lace melt beautifully into your skin. Be careful and use low heat!
- Don’t over-spray. One or two thin layers is plenty. Piling on the Got2b spray creates a crusty residue that actually looks worse and can irritate your skin. Less is more!
- Use a scalp protector first. If you have sensitive skin, apply a thin layer of scalp protector serum before the Got2b spray to create a barrier between the product and your skin.
- Baby hairs are your best friend. Lay them with a soft toothbrush and a tiny bit of Got2b gel for that effortless, lived-in look that makes the whole install read as natural hair.
Also — and this is important! — never, ever pull the wig off without properly removing the adhesive first. Use a specialized adhesive remover, baby oil, or isopropyl alcohol on a cotton pad to gently dissolve the bond along your hairline before lifting the wig. Ripping it off causes tension alopecia over time, and your edges are simply not worth sacrificing for convenience.
How to Remove Your Got2b Spray Wig Installation Safely
Removal is just as important as installation, yet somehow it’s the step people rush through the most. Listen — your natural hair and edges deserve TLC. A proper removal process keeps your scalp healthy and preserves both the wig and your hairline for the long run.
Apply isopropyl alcohol (70% or higher) or a dedicated adhesive remover like this one from Amazon to a cotton pad and gently press it along your hairline. Hold for 10–15 seconds to allow the solvent to break down the Got2b spray. Then slowly and patiently lift the lace — don’t tug! Work in sections, applying more remover as needed until the lace lifts freely. Once the wig is off, cleanse your scalp, moisturize, and let your natural hair breathe for a day before your next install.
Frequently Asked Questions About How to Install Wig with Got2b Spray
Is Got2b spray safe for my skin and hairline?
For most people, Got2b spray is quite skin-friendly compared to traditional wig adhesives, which often contain latex and harsh chemicals. However, if you have sensitive skin or a known sensitivity to hair products, always do a patch test first. Apply a small amount to the inside of your wrist and wait 24 hours before using it on your hairline.
Can I use Got2b spray on a synthetic wig?
Absolutely! Got2b spray works on both human hair and synthetic lace wigs. It doesn’t discriminate! Just keep in mind that synthetic hair is more sensitive to heat, so be extra cautious if you’re using a blow dryer during the setting process. Use the cool setting only.
How do I keep my install from lifting in humid or hot weather?
Humidity is the archenemy of a Got2b install — no sugarcoating it! The best approach is to use Got2b gel underneath the spray layer as a base, apply the spray on top, and then blow dry on cool setting to set the bond properly. You can also apply a thin layer of Got2b gel along the perimeter of the lace with a brush for an extra layer of security. Trust us, layering is the move.
Can I get my wig wet while it’s installed with Got2b spray?
Got2b spray is not waterproof, so activities involving significant water exposure — swimming, heavy rain, intense sweating — will loosen the bond noticeably. Light moisture, like light rain or normal sweating, is usually manageable, but you’ll want to reinforce your edges afterward. If you’re planning on swimming, opt for a stronger medical-grade wig adhesive for that day.
What’s the difference between Got2b spray and Got2b gel for wig installation?
Both are fantastic, and many wig wearers use them together! The spray is great for covering a broader surface area quickly and creating an initial bond, while the gel offers more precision and is excellent for laying baby hairs and pressing down specific edges. The ultimate combo? Apply gel along the hairline first, let it get tacky, then finish with the spray over the lace for double the hold.
Does Got2b spray damage lace over time?
With proper removal and care, Got2b spray is generally gentle on lace. The key is always using a proper adhesive remover — never dry-pulling the lace. Consistently yanking the lace without removing the product first will break down the fibers and shorten your wig’s lifespan. Treated well, a quality lace wig can last 12–24 months or even longer!
The Bottom Line: Your New Signature Install Method
There you have it — a complete, no-fluff breakdown of how to install wig with Got2b spray from start to finish. Once you’ve got this method down, it honestly becomes second nature. The Got2b spray is one of those beauty hacks that the community swears by for a reason: it’s effective, budget-friendly, skin-safe (for most), and remarkably accessible.
The real secret ingredient, though? Patience. Rushing through a wig install is the fastest way to a wonky hairline and a frustrated afternoon. Give each step the time it deserves, invest in a quality wig from a trusted source like KissLove Hair or Ashimary Hair, and treat your natural hair with kindness throughout the process.
Whether you’re going for a sleek 613 bob, a long curly unit, or a natural textured look, Got2b spray is your ride-or-die. Now go slay those edges — you’ve got everything you need!