How to Apply a Lace Front Wig: The Ultimate Wig Install Guide for a Flawless, Natural Look
From Prep to Slay — Everything You Need to Know About How to Wig Install Like an Absolute Pro
Ready to level up your hair game? Whether you’re a total newbie or just need a refresher, this guide breaks down how to wig install a lace front wig from start to finish — prep, application, styling, and everything in between. Say hello to your best hair day yet!
This post contains affiliate links. If you purchase through my links, I may earn a small commission at no extra cost to you. I only ever recommend products I genuinely believe in.
Let’s be real — there’s something seriously magical about putting on a beautiful lace front wig and suddenly feeling like a whole new version of yourself. But if you’ve ever wrestled with a wig that slips, bunches, or just plain looks fake, you know the struggle is very real. Don’t worry, though — we’ve all been there! The good news? Once you nail the technique of how to wig install properly, the whole process becomes second nature. We’re talking flawless hairlines, secure hold, and a finish that’ll have people asking, “Wait — is that your real hair?!”
In this guide, we’re walking you through every single step, from prepping your natural hair to customizing that lace for a truly undetectable look. Grab your tools, pour yourself a cup of something nice, and let’s get into it!
What Exactly Is a Lace Front Wig? (And Why Should You Care?)

Before we dive into the nuts and bolts of how to wig install, let’s make sure we’re on the same page about what a lace front wig actually is. A lace front wig features a sheer lace panel along the front hairline — typically stretching from ear to ear — where individual hair strands are hand-tied to mimic the look of natural hair growth. The result? A hairline so realistic, it’s practically undetectable. Mind. Blown.
Unlike traditional wigs that sit noticeably on the scalp, lace fronts allow you to part the hair, pull it back, and style it in countless ways without revealing the wig’s edge. According to the American Academy of Dermatology (AAD), wigs are an excellent option for people experiencing hair loss, thinning, or those simply looking for a versatile protective style. So yeah, whether you’re in it for fashion or function, lace fronts are a total game-changer.
Tools You’ll Need Before You Start Your Wig Install
You wouldn’t try to bake a cake without measuring cups, right? Same logic applies here! Having the right tools on hand is literally half the battle when it comes to a smooth, stress-free install. Trust us — scrambling around your bathroom mid-application is no fun at all.
Your Essential Wig Install Toolkit
- Wig cap (mesh or nylon) — keeps your natural hair flat and creates a smooth base
- Wig glue or adhesive (like Ghost Bond XL on Amazon) — the MVP of any glued install
- Edge control or Got2b Glued Spray — for laying down those baby hairs
- Wig scissors — sharp, precise, non-negotiable
- Rat-tail comb and a wide-tooth comb
- Alcohol swabs or scalp protector — for prepping the skin
- Blow dryer — speeds up drying time dramatically
- Bobby pins — your secret weapon for securing without glue
Pro Tip (FYI!): If you’re sensitive to adhesives or prefer a glue-free install, elastic band methods and adjustable straps work just as well — especially for beginners! Check out wig grip bands on Amazon as a fantastic, skin-friendly alternative.
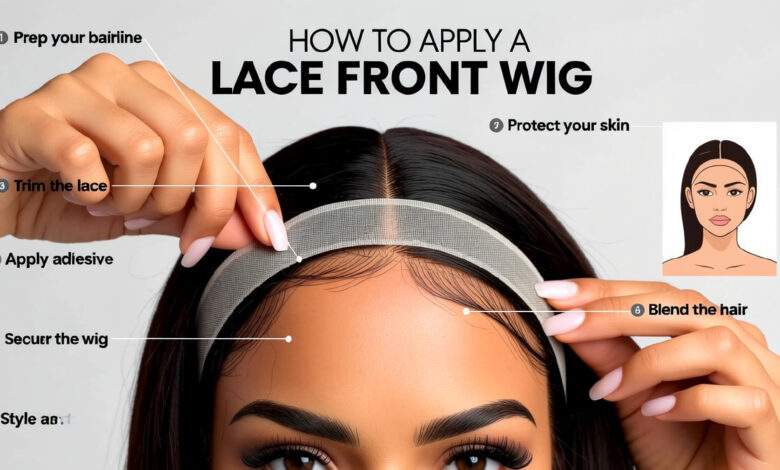
Step-by-Step: How to Wig Install a Lace Front Wig
Alright, here’s where the magic happens! We’re going to walk through how to wig install in a way that’s clear, doable, and honestly kind of fun. These steps are beginner-friendly but effective enough for seasoned wig wearers looking to sharpen their technique.
Step 1 — Prep Your Natural Hair
First things first — your natural hair needs to be as flat as possible underneath the wig. Braid your hair in flat cornrows going backward, or if your hair is short, simply wrap it flat against your head and secure everything with bobby pins. Then pop on your wig cap. The flatter the base, the more natural your wig will look.
Here’s a little-known secret: apply a thin layer of edge control around your hairline before putting on the wig cap. This keeps those sneaky flyaways from poking through. Smart, right?
Step 2 — Prep Your Lace Front Wig
Before applying the wig, you’ll want to trim the excess lace. Using your sharp wig scissors, carefully cut along the hairline — leave about ¼ inch of lace beyond the last hair. Don’t rush this step; a jagged cut is the fastest way to blow your cover! If your wig still has that factory shine, hit it with a light spray of dry shampoo or setting spray to dull the sheen.
Want to go the extra mile? Plucking a few hairs from the frontal with a pair of tweezers gives a more natural, less “doll-like” density. Bleaching the knots is also a great move — it makes the hairline look like it’s literally growing from your scalp. Talk about undetectable!
Step 3 — Protect Your Skin and Apply Adhesive
Wipe down your hairline with an alcohol swab — this removes oils and ensures the adhesive grips properly. Wait for it to dry completely (about 30 seconds), then apply your scalp protector if you’re using one. Next, apply a thin layer of wig glue along your hairline and let it become tacky — not dry, not wet. Tacky is the sweet spot, y’all.
A little reminder: more glue doesn’t mean better hold. It usually means a shiny, messy hairline that screams “wig alert!” Keep that application thin and even, and you’ll thank yourself later.
Step 4 — Place and Press the Wig
Carefully place the wig on your head, starting from the front hairline and working backward. Align the ear tabs with your actual ears, then press the lace firmly against the tacky adhesive. Use a blow dryer on low heat for 30–60 seconds to set the bond — this is the difference between a wig that lasts three days and one that lasts three weeks! Press firmly with a scarf or headband for a few minutes while the glue fully cures.
Voilà! You’ve done it. Step back and take a look — because that hairline? Absolutely chef’s kiss.
Step 5 — Style and Blend Like a Pro
Now the fun part — styling! Use your rat-tail comb to part the hair, lay your baby hairs with edge control and a fine-tooth brush, and style to your heart’s content. If there’s a visible color difference between your lace and skin tone, a little lace tint spray (here’s a great option: Lace Tint Spray on Amazon) or a dab of foundation will work absolute wonders.
Once styled, step into natural light and check a mirror. Natural light is the real test of how undetectable your install is — if it passes that test, you’re golden, baby!
How to Maintain Your Lace Front Wig Post-Install
You’ve nailed the install — congratulations! But the work doesn’t stop there, friend. Proper maintenance is what separates a wig that looks amazing on day one from one that keeps looking amazing on day fifteen. Think of it as the long game.
At night, always wrap your wig in a satin scarf or sleep on a satin pillowcase to reduce friction and frizz. Wash your wig every 10–14 days using sulfate-free shampoo and lukewarm water — never hot, because heat is the enemy of wig longevity. According to a care guide by Healthline, using the right products dramatically extends the lifespan of both synthetic and human hair wigs. Deep condition once a month to keep things soft and lustrous. Smart maintenance equals more bang for your buck!
Frequently Asked Questions About Wig Install
How long does a lace front wig install last?
With proper application and a quality adhesive, a lace front wig install can last anywhere from 1 to 6 weeks. It depends on your skin type, the adhesive used, and day-to-day maintenance. Oily skin tends to break down adhesives faster, so touch-ups may be needed sooner.
Can I apply a lace front wig without glue?
Absolutely, yes! A glue-free wig install is totally doable and preferred by many. You can use adjustable combs, elastic bands, wig grip headbands, or the Got2b Glued hairspray method for a secure, glue-free hold. Great for sensitive skin!
Does installing a lace front wig damage natural hair?
When done correctly, it shouldn’t! Never apply adhesive directly to your natural hair — only to your skin or wig cap — and always use a scalp protector. Remove the wig gently with an adhesive remover, never by yanking, and your edges will stay safe and healthy.
What’s the best adhesive for a lace front wig install?
It depends on your lifestyle. For everyday wear, Ghost Bond XL and Bold Hold are fan favorites. For sweat-proof hold, Walker Tape’s Ultra Hold is a top pick. For sensitive skin, go with a water-based option like skin-safe wig glue on Amazon.
How do I remove a lace front wig without damaging my skin?
Always use a dedicated adhesive remover — like Isopropyl Myristate or C-22 Solvent — applied along the hairline to loosen the bond before peeling. Work slowly from ear to ear, and follow up with a good moisturizer to restore hydration to your skin.
Helpful Resources to Sharpen Your Wig Game
The hair community is full of incredible resources to help you keep growing — no pun intended! Here are a few worth bookmarking:
- Complete Lace Front Wig Install Kits on Amazon
- Wig Stands & Mannequin Heads on Amazon
- Sulfate-Free Wig Shampoo on Amazon
The Final Word — Your Wig Journey Starts Now!
And there you have it — a complete, step-by-step breakdown of how to wig install a lace front wig from the very beginning to that jaw-dropping finished look. What once seemed like an intimidating, multi-step ritual is really just about preparation, patience, and a little practice. Seriously — the first install is always the hardest, and it only gets easier from there!
Whether you’re wearing wigs for protective styling, medical reasons, or simply because you want a fabulous new look every week, lace front wigs are one of the most versatile, transformative beauty tools out there. Experiment with colors, textures, and styles. Mix it up! Your hair — real or installed — is your crown, and you deserve to wear it flawlessly.
Now that you know everything about how to apply a lace front wig, what are you waiting for? Get out there and slay!