If you’ve got long, thick locks and you’re dying to rock a wig, you’ve probably wondered: is there a “right” way to do this? Spoiler alert — yes, there absolutely is! Knowing how to wig cap long hair properly is the difference between a gorgeous, confidence-boosting look and a lumpy, sliding disaster. Let’s fix that, shall we?
This post contains affiliate links. If you purchase through my links, I may earn a small commission at no extra cost to you. I only ever recommend products I genuinely believe in.
How to Wig Cap Long Hair – Everything You Need to Know for a Perfect Base
So, you’ve got long hair and a fabulous wig waiting to be worn. Exciting stuff! But here’s the thing — long hair and wigs don’t always play nicely together… unless you know exactly what you’re doing. The good news? Once you nail the prep, everything else falls into place like a dream.
Whether you’re a wig newbie or a seasoned pro who’s been struggling with bulky, uneven bases, this guide walks you through the whole process — step by step, no hair left behind. We’re talking braiding methods, cap types, securing tricks, and more. Ready? Let’s dive in!
Why Proper Wig Capping Actually Matters
Here’s a truth bomb for you: the wig itself is only half the story. The foundation — meaning how you prep and cap your natural hair underneath — is what truly makes or breaks your look. Skipping this step is like painting a wall without priming it first. Sure, it might look okay for a minute, but it’s not going to last.

For people with long hair especially, this step is non-negotiable. Long hair has volume, length, and texture that can create lumps, bumps, and movement under a wig cap, which makes the wig sit higher on your head and look less natural. A properly laid foundation, though? Chef’s kiss. Flat, secure, comfortable — all day long.
What You’ll Need Before You Start
Before we jump into the how-to, let’s talk supplies. Think of this as your wig-capping toolkit. Having everything on hand saves time and prevents those mid-session scrambles.
Here’s your checklist:
- Rat-tail comb – for neat parting and sectioning
- Bobby pins or hair pins – the more, the merrier (seriously)
- Edge control or styling gel – to smooth flyaways and baby hairs
- Hair ties or rubber bands – for securing braids or buns
- Wig cap(s) – nylon stocking cap, mesh wig cap, or dome cap
- Wig grip band (optional but highly recommended) – keeps everything in place
- Hairspray – for extra hold
A great option for wig caps is the FANDAMEI Nylon Wig Caps (6-pack), which are stretchy, breathable, and work beautifully for long, thick hair. Affordable and reliable — win-win!
Step-by-Step: How to Wig Cap Long Hair Like a Pro
Alright, here’s the meat of it all. Follow these steps carefully, and you’ll have a flat, smooth base that’ll make your wig look like it grew right out of your scalp.
Step 1 – Start With Clean, Dry Hair
This might seem obvious, but it’s worth saying: always start with freshly washed and completely dry hair. Damp hair under a wig cap is a recipe for scalp issues, mildew smell, and discomfort. Gross, right? So let that hair dry fully before you begin.
If your hair is naturally frizzy or voluminous, consider applying a light smoothing cream or heat protectant before blow-drying. This makes the braiding or pinning stage way easier and gives you a smoother base to work with.
Step 2 – Braid or Flatten Your Hair
This is where knowing how to wig cap long hair really starts to get specific. Long hair needs to go somewhere — and the best place is flat against your head. Here are your main options:
Option A: Cornrow Method (Most Popular for Long Hair)
- Section your hair into two or four parts.
- Braid each section in a cornrow, working from front to back or in a circular pattern.
- Tuck and pin the ends of each braid flat against your head.
- Make sure no braid is sticking up or creating a bump.
Option B: Two Flat Braids / Dutch Braids
- Split your hair down the middle.
- Braid each side into a tight flat braid.
- Wrap the braids across the back of your head and pin them securely.
Option C: The Wrap Method (For Straighter or Finer Long Hair)
- Comb your hair smooth.
- Direct all hair in a circular wrap around your head.
- Pin flat as you go, layering hair neatly.
- Finish with a generous spritz of hairspray.
Whichever method you choose, the goal is the same: as flat as humanly possible.
Step 3 – Smooth Down Edges
Don’t skip this part! Use edge control or a light gel to slick down your edges and baby hairs. This prevents those sneaky little hairs from poking through the wig cap or peeking out at your hairline. Run a fine-tooth comb or a soft toothbrush along your edges for extra neatness.
Your edges should be laid, babe. Completely laid.
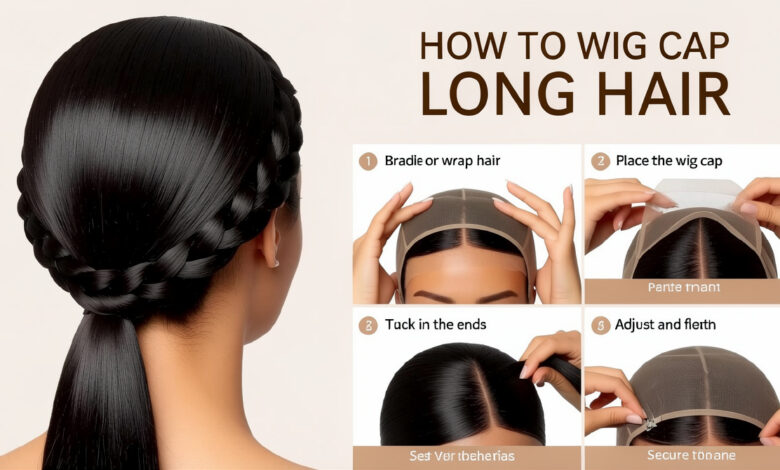
Step 4 – Put On Your Wig Cap
Now for the wig cap itself! Slide the cap over your head starting from your hairline, then stretch it back over your nape. Here’s what to keep in mind:
- Nylon stocking cap: Thin, lightweight, great for a nearly invisible base. Best for those whose wig has a full lace front.
- Mesh wig cap: Slightly thicker, offers more structure, breathable. A solid all-rounder.
- Dome cap: Thicker and more padded. Great for beginners or those who want extra grip.
Tuck any stray hairs inside the cap as you go. If needed, wear two caps — a nylon one first for smoothness, then a mesh cap on top for structure and grip. This double-cap method is a game-changer for people with very long or very thick hair!
You can find excellent options like the HEOYA Wig Caps Bundle on Amazon, which includes both stocking and dome styles.
Step 5 – Secure the Cap and Add a Wig Grip Band
Once the cap is on, pin it down at the edges using bobby pins or wig grip clips. Point the bobby pins toward the cap (not outward) to keep them hidden.
Adding a wig grip band around your hairline — underneath the wig but over the cap — provides an incredible amount of extra security without any glue or tape. For long days or high-activity moments (yes, even dancing!), this is your best friend.
Step 6 – You’re Ready to Lay Your Wig!
With your hair flat, your cap secure, and your edges smooth — go ahead and place your wig on top! Adjust the straps or combs inside the wig to fit snugly. If it’s a lace front, lay that lace down with your preferred adhesive or wig tape and smooth it with a fine comb.
Voila — a totally natural, secure, long-lasting look!
Best Braiding Patterns for Wig Capping Long Hair
Not all braiding patterns are created equal, and the “best” one really depends on your hair type, your wig type, and your lifestyle. Let’s break it down:
- Cornrows going straight back: Best for full lace wigs or 360 lace wigs. Keeps the hairline area super flat.
- Circular cornrows: Excellent for bobs or shorter wigs — distributes bulk evenly.
- French roll / barrel roll: Great for silky or straight long hair that doesn’t hold braids well.
- Pin-up sections: Ideal for fine long hair that needs flat pinning rather than braiding.
Try a few and see what works! Hair is personal, and what works for one person might not be the magic solution for someone else. That’s totally okay.
For inspiration and detailed braid tutorials, check out Ashimary Hair’s blog — they have awesome content specifically about wig prep and protective styling. Similarly, Kiss Love Hair has great resources on wig installation for different hair types.
Common Mistakes to Avoid When Wig Capping Long Hair
Oh boy, have I seen some wig-capping horror stories! Here are the mistakes that trip people up the most — and how to dodge them:
- Not pinning braids flat enough — If your braids sit too high, your wig will literally perch on top of your head. Pin those ends down firmly!
- Using a cap that’s too small — Long hair adds volume. Go up a size if needed, or opt for extra-stretchy nylon caps.
- Skipping edge control — Baby hairs peeking through the lace or poking around the hairline is a dead giveaway. Slick ’em down!
- Putting a wig on damp hair — This leads to breakage, mildew, and discomfort. Always, always start with dry hair.
- Forgetting to secure the cap — A cap that slides = a wig that slides. Use pins and a grip band.
- Braiding too tightly — Protective styling is supposed to protect your hair, not damage it! Tight braids can cause tension alopecia over time. Be gentle.
How to Maintain Your Wig Cap and Natural Hair Underneath
So you’ve learned how to wig cap long hair — amazing! But what about maintenance? Wearing wigs daily means your natural hair is under a cap for extended periods. Here’s how to keep it healthy:
- Moisturize regularly: Even under a cap, your scalp needs hydration. Apply a light oil or moisturizer to your scalp every 2–3 days.
- Take breaks: Give your scalp breathing time every few days. Let your hair down, wash it, and air dry before re-capping.
- Sleep with a silk or satin bonnet: When you remove your wig at night, protect your braided hair with a satin cap to prevent frizz and dryness.
- Redo your braids weekly: After about 7–10 days, braids start to loosen and get fluffy — which means more bulk under your wig. Re-braid for a consistently flat base.
For long-term wig wearing, check out this edge control product on Amazon designed specifically for wig wearers with thick hair. It holds all day without flaking — a total must-have!
Frequently Asked Questions About How to Wig Cap Long Hair
Q: Can I wear a wig without braiding my long hair first?
Technically, yes — but should you? Not really. Without braiding or pinning your hair flat, you’ll get a lumpy, elevated base that makes the wig look unnatural and sit loosely. Braiding is the most reliable way to create a flat, manageable surface under your wig cap.
Q: How many wig caps should I use for very thick, long hair?
Most people with very thick or very long hair benefit from using two caps — a thin nylon stocking cap first, followed by a sturdier mesh or dome cap on top. This combo gives you both smoothness and structure.
Q: Will wig capping damage my natural long hair?
Not if done correctly! The key is to avoid excessively tight braids, ensure your hair is moisturized, and take regular breaks from wearing wigs. Protective styling, when done properly, actually promotes hair health — it shields your ends and minimizes daily manipulation.
Q: How do I stop my wig from slipping if I have long hair underneath?
Use a wig grip band! This elastic, velvet-lined band sits along your hairline under your wig and creates friction that keeps everything in place — no glue, no tape, no stress.
Q: What’s the best wig cap for long, fine hair?
A nylon stocking cap is ideal for fine, long hair because it’s ultra-thin and doesn’t add bulk. Pair it with a light wrap method instead of braiding, and you’ll get a beautifully smooth base.
Wrapping It All Up — Your Long-Hair Wig Journey Starts Here!
And there you have it — a complete, no-nonsense guide on how to wig cap long hair that covers everything from prep to pin-down. It might feel like a lot of steps at first, but trust me: once you do it two or three times, it becomes second nature. Muscle memory kicks in, and you’ll be capping up in under 15 minutes like a total pro!
Long hair and wigs aren’t enemies — they just need a little introduction and the right technique to coexist beautifully. Whether you’re rocking a sleek bob wig over waist-length braids or a voluminous curly unit over your naturally thick mane, the foundation you create underneath is everything.
So grab those bobby pins, lay those edges, pop on that cap, and go slay! Your wig era is officially here, and it’s going to look absolutely incredible.